下载源码,并安装依赖
# 1
git clone https://github.com/vuejs/vue.git
# 2
pnpm install
开启sourcemap,默认的dev脚本没有对应sourcemap文件,需要修改srcipts/config.js(rollup配置)的output选项,新增sourcemap:true
新增sourcemap
...
output: {
  file: opts.dest,
  format: opts.format,
  banner: opts.banner,
  name: opts.moduleName || 'Vue',
  exports: 'auto',
  // 新增sourcemap
  sourcemap: true
}
...
生成开发环境的打包文件
pnpm dev
新增测试入口文件index.html(不考虑sfc,直接使用模板)
<!doctype html>
<html lang="en">
  <head>
    <meta charset="UTF-8" />
    <meta http-equiv="X-UA-Compatible" content="IE=edge" />
    <meta name="viewport" content="width=device-width, initial-scale=1.0" />
    <title>Document</title>
    <script src="../dist/vue.js"></script>
  </head>
  <body>
    <div id="app"><test :msg="message"></test></div>
    <script>
      const { reactive, h, ref } = Vue
      const vm = new Vue({
        components: {
          test: {
            props: ['msg'],
            template: `<div>{{msg.text}}</div>`,
          },
        },
        data() {
          return {
            message: { text: 'Hello World!' },
          }
        },
      })
      vm.$mount('#app')
      window.vm = vm
    </script>
  </body>
</html>
开启调试
在vscode中打开新增的index.html文件,按F5即可打开调试模式
下载源码,并安装依赖
# 1
git clone https://github.com/vuejs/core.git
# 2
pnpm install
安装vscode的vitest扩展插件
新增单元测试入口文件,比如dev.spec.ts
// 假设测试将ref作为reactive的参数的整个流程
import { reactive, ref } from '../src'
test('reative use ref', () => {
  const refValue = ref({ path: '/test' })
  const reactiveValue = reactive(refValue)
  expect(reactiveValue.value).toBe(refValue.value)
})
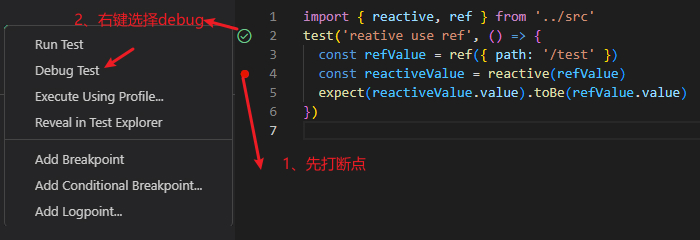
使用vitest(ide文档)插件后,按照下图操作即可进行debug
